Quick Reviews of GoPro Accessories
Filed Under Gadgets & Hardware, Photography, Video | 2012-05-29, 11:00
As a birthday present this year, my wife got me a GoPro HD Hero2 camera that I had been wanting for quite some time. Over the past couple of months I’ve spent quite a bit of time with it, as well as money on accessories. After answering questions from other people interested in the camera and accessories, I figured I’d put together a post for reference. I’ll focus mainly on accessories since the camera itself is awesome and doesn’t really have any competition to compare it with.

Normal Accessories:
I got the GoPro HD Hero2 Outdoor edition, which comes with what are in my opinion the most versatile accessories. If you intend to use the GoPro for surfing or motorsports, one of the other editions might be better for you. However for most people I feel like the Outdoor edition is the best choice. Here are the accessories it comes with and my opinions:
– The Waterproof Housing is what you’ll probably be using a lot. Chances are you want a GoPro for rough conditions where you wouldn’t want to be using another camera. Whether it’s dust, water, or just weather, the waterproof housing will be what you turn to.
– The HD Skeleton Backdoor is good when you don’t need to be water/dust/weather-proof, and want to capture sound a little bit better. The GoPro doesn’t get great sound in the waterproof housing. Also if there’s a chance for fogging, this housing is a good solution.
– I’ve only used the Vented Helmet Strap once on my normal bike commute to work through San Francisco. It was a boring video as my commute is usually boring, but I imagine anyone doing mountain biking or something similar would find a good use for this.
– I haven’t found a use for the Head Strap yet.
– I’ve already used both Flat Surface Adhesive Mounts. I put one on the inside of my windshield to do a drive time-lapse. Then upon viewing the video realized I positioned the camera directly in front of a ding in my windshield. *fist shake* The other mount was used on the inside of the windshield to relocate the camera. I’ve heard that these mounts can be removed with heat (such as a hair dryer) and then potentially reused with the existing sticky tape, or just ripping that off and attaching cheap 3M high density foam sticky tape to it. I haven’t used the Curved Adhesive Mounts as the snow season out here sucked this year. I imagine next year I’ll use them to attach the GoPro to my snowboarding helmet
– Haven’t found a use for the Three-Way Pivot arm other than the extra screw thing. (See GoPro Tripod Mount)
– Also comes with a USB Cable, the default battery and other assorted mounting bits.
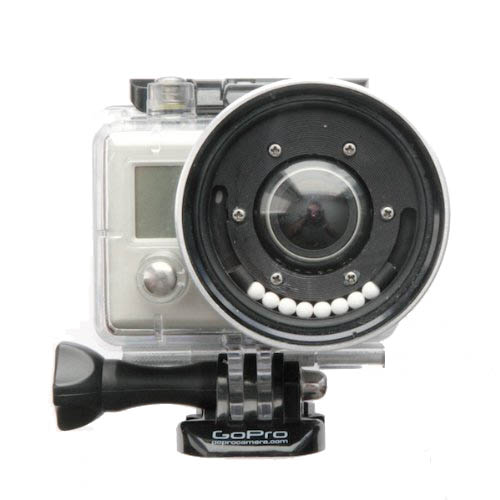
BlurFix GoPro Adapter
I modified the default waterproof housing by adding the BlurFix from Snake River Prototyping as I was planning on going diving in the British Virgin Islands and wanted crisp, clear video underwater. In the time since I modified my housing, GoPro has come out with a Dive housing that appears to have promise. I haven’t used one yet though, and will probably stick with the BlurFix for now since it’s what I have and it works well.
The BlurFix was relatively easy to add to the housing, however you can buy one with it already attached if you’re nervous about the process. The GoPro + BlurFix resulted in really nice video underwater for a couple of snorkeling trips in British Virgin Islands. However right before our SCUBA dive, I accidentally dropped the GoPro (ironically while adjusting the homemade wrist strap) and the filter on the front cracked. :( This meant all the subsequent dive trips were with the default GoPro housing lens. The difference in video from the default lens and the addition of the BlurFix is remarkable. If you’re filming underwater, don’t use the default waterproof housing.
Another thing I learned from my SCUBA footage is that the diving more than a few feet below the surface really begs for a lens filter. Snake River Prototyping includes a default UV filter with the BlurFix that has been filed down for a low profile (to reduce vignetting), but they also offer a number of other 55mm filters including filters intended for underwater use. As soon as I got home from the British Virgin Islands, I bought a replacement UV filter (plus a backup) as well as a URPro CY Filter from SRP so I would have them for the next trip. I also got the pricey $11 lens cap from SRP as the filed down low profile filters won’t take normal lens caps anymore. I have yet to play with other filters, such as polarizing filter, but in theory any normal 55mm filter should work, however there are reports of minor vignetting. One downside of the official GoPro Dive housing is that it won’t take any normal lens filters. It looks like it’s just a clear glass lens so I have to wonder how it does in deeper water in real life scenarios.
Conclusion: Worth the money for any underwater filming.
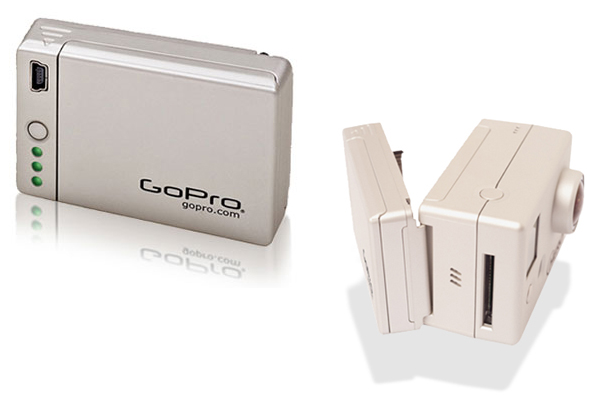
Battery BacPac
The Battery BacPac is by far the accessory I use the most. Since I do a lot of time-lapses I need the extra battery life. Fun Fact: Unlike other cameras, the GoPro remains powered on fully while doing a time-lapse, draining batteries in a couple of hours. If you’re doing a time-lapse or are planning on being away from a power source for a long time. The Battery BacPac and extra batteries are your friend. It’s also handy because you can use it as a battery charger in a pinch. And it’s a good way to know how much life you have left in a battery as it will be displayed by the green LEDs when you hit the button.
Conclusion: Worth the money.

Wasabi Battery and Charger Kit
One of the most annoying things I found out first about the GoPro was it’s lack of external charger. If you wanted to charge a battery you had to put it in the camera and plug it in via the USB cable. That meant no charging while shooting video out and about. I quickly bought the “Wasabi Power Battery and Charger Kit” which came with two additional batteries and a charger that would plug into both a normal wall outlet as well as an auto cigarette lighter outlet. All for less than $30. Hands down my first recommended accessory purchase. Pairing this with the Battery BacPac means I have yet to find myself in a situation where I’ve run out of battery power for my GoPro.
Conclusion: I couldn’t live without this.
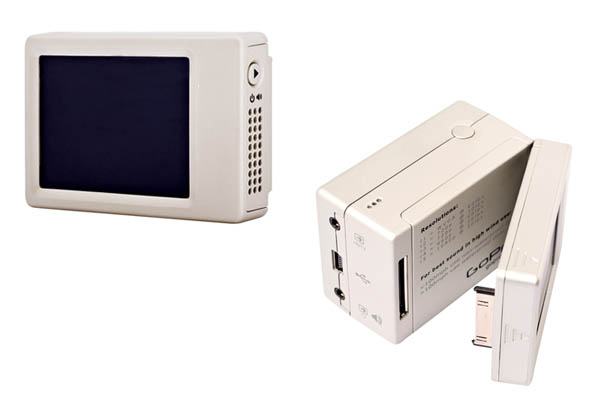
LCD BacPac
The GoPro LCD BacPac screen was purchased on a whim with a birthday gift card. It was one of those “nice to have, but not required” accessories. Because the GoPro has such a wide lens, it’s pretty easy to point it at something and capture what you want. It may not always be centered and level though. I noticed this often with my timelapses so I thought I’d give the LCD a try. It does help a bit. It’s also handy for playing back videos and provides a slightly better interface for the menu, however I rarely use it. I’d recommend shooting a couple videos with the GoPro first before deciding you need the LCD. It’s pricey, but for some people I can imagine it would be very important. Keep in mind though that it prevents you from using the Battery BacPac and will additionally drain your battery.
Conclusion: Meh, probably not worth the money unless you know need it.
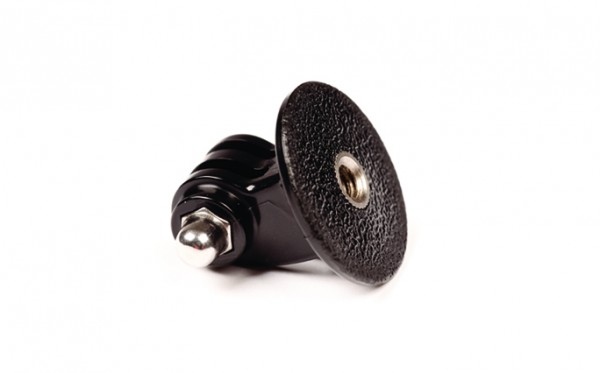
GoPro Tripod Mount
Buy it. It’s cheap, and it allows you to attach your GoPro to a number of different things. I personally use it mostly with an original GorillaPod. This is very useful if you’ve already invested in other camera mounting gear like tripods, monopods, GorillaPods, etc. This doesn’t come with a screw knob, but you can borrow the one of the Three-Way Pivot Arm.
Conclusion: No brainer if you have existing camera mounting hardware.
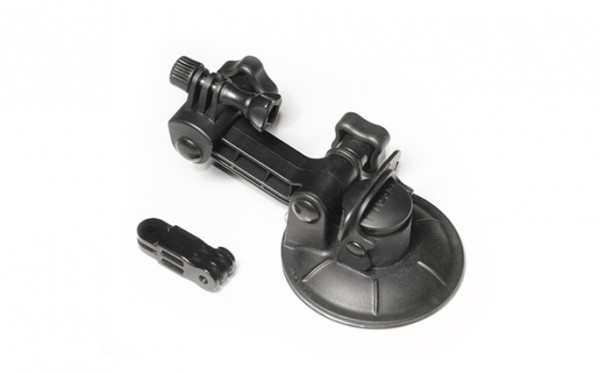
GoPro Suction Cup Mount
The GoPro Suction Cup Mount is one of the accessories I bought and have found myself most disappointed with. They say it’s supposed to keep your GoPro attached to a car (or even an airplane) at high speeds. I’ve only used it once, attaching it to an indoor window as a test to see how well the suction cup performed. It failed. I came back into the room and the camera was on the floor. I suspect that I may have needed to clean the suction cup and the window better, but my confidence in this mount has decreased so much that I’m worried about using it anywhere dangerous to the camera. I would definitely not recommend using it without some sort of backup device to prevent your camera from disappearing, i.e. a leash of some sort.
Conclusion: No sir, I don’t trust it one bit.
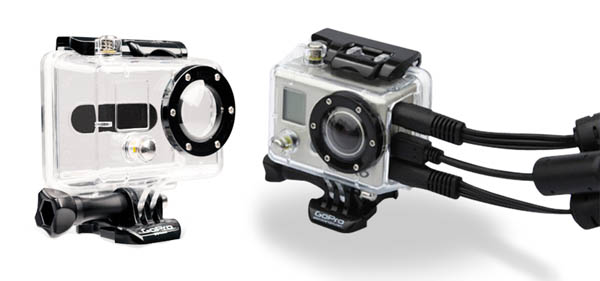
Additional Housings
Since I modified my original housing to add the BlurFix adapter I realized that I no longer had a GoPro housing that was capable of handling rough and tumble situations since the glass lens was susceptible to breakage. So I recently bought an additional GoPro Waterproof Housing, as well as a GoPro Skeleton Housing. The Skeleton Housing is by no means weatherproof, however it gives you access to the GoPro ports while shooting video. This means you can attach an external power source, providing unlimited power for long videos and time-lapses. I look forward to doing some longer driving time-lapses with this.
SD Cards, Laptop, Software, etc.
I’m using Transcend 32 GB Class 10 SDHC Flash Memory Cards. They’re cheap on Amazon (<$1 per GB) and are fast enough to handle the GoPro's output. If you're like me, you've got a handful of SD cards laying around. Check to make sure they're Class 10 (the fastest data transfer rates) before you toss them in your GoPro. There's no reason not to go with Class 10 cards unless you're extremely cost-sensitive. The GoPro produces high resolution stills and videos. Be prepared to deal with them. I actually experienced some annoyance at trying to deal with them on a 2008 Macbook Pro with only a 500GB drive. I upgraded to a 2012 Macbook Pro with a 2.4GHz quad-core Intel Core i7 processor, a 256GB SSD, and a 1TB drive (via OptiBay kit) and have zero trouble editing in iMovie. Eventually I'll maybe switch the software I use for video processing, but for now iMovie covers most of what I need for simple videos. It doesn't seem to like to export to full 1080p video, only 720x540, but since I'm mostly exporting for online viewing it's not that big of a deal. It may be a limitation of iMovie or it may be a setting I'm missing. If anyone has any feedback, let me know. A lot of people have reported fogging issues with their GoPro as the camera itself heats up with usage. Depending on moisture and temperatures you may experience the same. We ran into it only once in BVI while shooting some video of boat swinging. A quick wipe of the lens and things were fine, however we didn't notice it at first since we weren't using the LCD screen. People say the official GoPro fog strips are a bit pricey, but worth the money. I’ve purchased a pack and plan to use them to prevent fogging issues before they happen. There are some home-made remedies, but these are made to fit snugly inside the GoPro housing without damaging the camera itself.
Finally…
There’s a lot of info and video examples of what you can do with the GoPro online. One of the best forums I’ve found is GoProUser.freeforums.org. You’ll have to register, but it’s worth it to poke around on there.
I love my GoPro HD Hero2. It hasn’t replaced my iPhone as a daily-carry video camera since the GoPro requires more accessories and is a bit bulkier. However it does go on every trip with me now and I’m always trying to find an excuse to use it for something.
Oh wait, Videos!
Here are some videos I’ve taken with my GoPro HD Hero2. Keep in mind these aren’t full resolution. The resolution of the raw videos is far far better.
Curious Kiss Cafe Time-lapse
On on Highway 1 (driving time-lapse)
Snorkeling in the British Virgin Islands (with BlurFix)
Nelz goes Boat Swinging
San Francisco to Monterey drive time-lapse
Full disclosure: Nobody compensated me in any way for anything in this post, however some links are Amazon affiliate links.
Check out Zivity – 30 days for free
Filed Under Art, Photography, Websites | 2010-02-22, 15:56

The internet is awash in adult content, we all know that. And there’s a lot of just plain crap out there that was made to make a buck. But occasionally the adult content mixes with art and something great comes out of it. Zivity is one of those examples.
For those not familiar, Zivity is a site where photographers and models get together and shoot some amazing photos. The site is decidedly Not Safe For Work (NSFW), so go check it out when you’re at home. Just to be clear, you’re not going to find your run of the mill porn there. Zivity encourages “photographs of women that promote their beuaty, show them respect, and meet [their] standards of tastefulness”. One of my favorite things about Zivity is the way their revenue is handled. Rather than paying a flat fee to photographers and models and then making bank off of their shoots indefinitely, they pay the photographers and models based on votes. As a user of the site, you buy votes for $1 a piece and you can then vote on your favorite models and photographers. For me personally, it’s a small way that I can help friends make a little bit of money making the art that they enjoy. The pretty pictures are an added bonus!
So enough of the sales pitch type talk. For the record I don’t currently receive any commission on anything from Zivity (other than an account on the site), but I recommend it to people who are into this sort of thing. Cyan, the founder of Zivity, was kind enough to offer free 30 day trial accounts to readers. All you have to do is email geeked@zivity.com and ask nicely for an invite.
Thunder and Lightning in SF
Filed Under Photography, SF Bay Area, Video | 2010-01-19, 17:34
The way that Twitter blows up during large thunderstorms, you’d think that lightning and thunder in the Bay Area is rarer than earthquakes. Well, I’m not sure of the stats, but it just might be. Early this morning I woke up gained some semblance of consciousness as thunder rolled through San Francisco along with storms that have continued on and off all day.
After seeing the flash of lightning and the sound of thunder half a dozen times, I decided to setup my Zoom H2 audio recorder and Flip video camera to see what I could capture. Only three minutes later lightning struck again. My Flip video camera isn’t quite up to the task of recording lightning, but you can see a flickr and hear the thunder (along with some guy on the street yelling). The audio recorder is slightly better at it’s job, picking up the echoing thunder as it traveled across the city.
And of course, once the rain tapered off, it was up to the roof with a camera to catch the awesome light as blue skies returned.

Sights and Sounds of the Blue Angels
Filed Under Photography, SF Bay Area | 2009-10-09, 13:01
It’s Fleet Week again in San Francisco, and as usual the debate over whether the Blue Angels are awesome or that they just represent war rages on Twitter and elsewhere online. Everyone has their own opinion, but politics aside, I love the technical aspect of these incredibly powerful jets flying over our city with talented pilots. Having roof access I went up and snapped a few pics. Additionally I grabbed my audio recorder and was able to capture a fly-by. Wondering why people are complaining about the noise? Turn your speakers way up and check out this MP3 to find out.
I love the Garmin eTrex Vista HCx and Geotagging
Filed Under Gadgets & Hardware, Geek, Photography | 2008-01-06, 03:19
I love GPS receivers. There’s something great about knowing exactly where you are, plus being able to track where you’ve been. They come in handy while hiking, walking around a city, or driving. And I have a very long history with these things. I used to have a carputer that combined a GPS receiver with software long before it was standard on cars. My carputer consisted of a shoebox+miniITX+LCD imported from Hong Kong. I’ve used a handful of GPS receivers that are meant to interface with laptops, but up until recently, have only owned one handheld receiver, a Garmin eTrex Legend (unless you count the Boost Mobile i415 or the Helio Ocean). I loved that little device, it got me into geocaching and was primarily bought for that purpose. I used to also enjoy taking it on plane flights and tracking our flight across the country. It also rode shotgun with two other GPSrs during my cross-country move from Chicago to San Francisco. But I always felt like it was lacking. With only 8mb of internal memory, I could barely load enough maps for trips. I couldn’t even squeeze the entire Bay Area on it. And the monochrome screen? So 2002. I’ve been meaning to upgrade for quite awhile, and prompted by a New Year’s trip to Joshua Tree, I finally caved during a last minute trip to REI.
I picked up a Garmin eTrex Vista HCx unit for $299.99 (you can get it cheaper, but I love REI’s return policy). It’s almost the same size as the old Legend, just a little shorter and fatter. The screen on it is gorgeous though. It’s amazing how much easier it is to read maps with colors. The best part about it though is the sensitivity of the receiver. With the old Legend, I had gotten accustomed to having to leave it on the dashboard in the car or carrying it in my hand while walking. It consistently complained about needing a clear view of the sky in order to lock onto satellites. The new Vista HCx scoffs at these needs. It was able to pick up satellites while stashed in the seat back pocket in the middle of my car! Amazingly it was also able to pick up a signal while inside! So armed with my new toy, we headed out to Joshua Tree. I basically left it on for the entire drive and most of the time we were out in the desert and it did a spectacular job of hardly ever losing a signal. It came in handy when trying to find our campsite that was a little over a mile from our cars and hidden amongst desert foliage that all looks the same. It also allowed me to keep tracks on where we went, whether it was climbing a mountain, scrambling over boulders, or even just wandering away from camp to *ahem* dig a hole.
This tracking all came in handy when I got back home and wanted to geotag the photos I had taken out there. I loaded up EasyGPS to download a .gpx file containing the tracks and then used gpicsync (a Google Code project) to stamp the GPS information into the EXIF header of the actual image files. From there I uploaded the photos to Flickr, which automatically interpreted the GPS coordinates and placed my photos on the map. The other cool thing about gpicsync is that it will create a Google Earth file that will let you load up Google Earth and fly around the world, seeing where your photos were taken. Quite awesome when you’ve been taking photos in the mountains and you can actually see which ridge you were on in 3-D.
So I highly recommend the Garmin eTrex Vista HCx. And no, they aren’t paying me to say that. :) Although, if you do want to pick one up, use this link: Garmin eTrex Vista HCx and Amazon will give me a few bucks. They’ve actually got a damn good price for it there.
And yes, it comes in handy when you need to mark a waypoint to point out where you found your girlfriend’s toothpaste when you’re practicing “Leave No Trace” camping. ;)
Eye-Fi Wireless SD Card
Filed Under Gadgets & Hardware, News, Photography | 2007-11-20, 20:08

Eye-Fi Wireless SD Card
Originally uploaded by edrabbit.
Finally got a minute to setup my Eye-Fi card. I must say I’m very happy with the finished product so far. I was very very glad to have both the options to upload directly to Flickr as well as to upload to a folder on a local machine. I was stuck with just Flickr support in the past and didn’t like how every single blurry photo got uploaded, not allowing me to pick and choose. Now with it uploading to my laptop via wireless, I can sort through them (organized by date even!) and pick which ones warrant the Flickr stream. All in all definitely worth $99 in my opinion.
This could definitely change the way photos are done. Imagine being at a protest or gathering. You snap some pictures of some sensitive stuff, the authorities confiscate your camera and destroy it. What they don’t realize is that all the pictures were wirelessly synced to your laptop in the car that has a wireless AP running. I can also imagine this being convenient to photographers, who can upload photos while they’re doing a shoot, so they can be reviewed instantaneously. I’m also trying to think of other projects where this could be fun. Mella and I have talked about putting together some portable cameras that this would be fun to work with.
So far there are only two things I wish the card could do. Have another 2 gb of space to match my 4gb (although I may be able to survive with space for 780+ photos/17minutes of video), and have a setting where I could tell it to connect to open networks that don’t require a password automatically. Oh, and add a third to that… support for RAW images would be nice!
Flickrvision
Filed Under Photography, Websites | 2007-05-14, 10:26
Because we all know you aren’t wasting nearly enough time with Twittervision, along comes the even cooler, flickrvision. Thanks David Troy.
24 Hours of Flickr
Filed Under Art, Photography | 2007-04-26, 19:36
There’s a new group over at Flickr, everyone’s favorite photo sharing site. The plan? To capture on day, 24 hours, in the life of the global Flickr community. On May 5th, 2007, they are asking everyone to grab their camera and document their day via photos. If you’ve got the ability to toss in the GPS info, or the time to map out the images, that’s even better! Only photos taken on May 5th are allowed, but you’ll have till the 21st for your lazy butt to get them uploaded.
The whole thing is going to be commemorated with a book to go along with the day. The book will be comprised of photos chosen from what promises to be thousands of photos that are submitted to the group. In addition, they’ll be using the photos to show at different events. Sounds like a fun time, and far less demanding than the 365 Days project.
More info over at the Flickr group


