Sunrise Time-lapse from the Burning Man Webcam in Gerlach, NV
Filed Under Burning Man, Video on 2012-08-30, 21:22 | Leave a Comment
Source images are from the Burning Man office webcam Taken on the morning of Sunday, August 25th. The gates opened later in the evening that day.
Tagged: time-lapse, timelapse
Surviving the Dust At Burning Man
Filed Under Burning Man on 2012-08-19, 13:11 | 1 Comment
Almost every year, a few weeks before Burning Man, word starts coming back from the playa that “it’s going to be dusty this year”. Most people that have been to the playa shrug this off with “it’s dusty every year”. This year however is a year to remind people that sometimes dusty doesn’t just mean annoying, it means potentially dangerous. As many know, 2011 had some of the best weather the event has ever seen. (No seriously, it was better last year.) Low winds, no dust storms, and almost perfect temperatures. This year may prove to be the exact opposite due to severe drought, high winds, and a lot more people to kick up dust.
Everyone’s gauge for what “dusty” is differs. My first year I showed up with a box of dust masks, full goggles, and even a two filter respirator. As the years have gone by I’ve made several trips back and forth to the playa for Burning Man and Juplaya and I now find myself usually running around with a pair of sunglasses and a bandana and calling that good. I still pack my respirator and googles just in case though as the playa can be an unpredictable and harsh mistress who doesn’t have a safe word.
Advice for Surviving Dust Storms at Burning Man
(You’ve already read the survival guide, right?)
1. Always have goggles and a dust mask on you
You can have them in your camelbak and never use them, but the one time you need them you’ll be glad you have them. Get a pair of goggles with replaceable lenses so you can have clear at night and tinted for the day.
2. Carry a GPS with your camp and other useful waypoints marked
Two years ago we found ourselves out in deep playa at night when a whiteout hit. We literally were walking blind except for my GPS. Without any sort of direction, it’s incredibly easy to get lost in a no-visibility situation and humans can’t walk straight. I’ve been using my Garmin eTrex Vista Hcx at the event for 4 years now. You can download GPS map files for Black Rock City here. Huge thanks to Will Keller for making these every year.
3. Stick together in a whiteout
It’s surprising how easy it is to lose friends in a whiteout, especially when it’s dark. We tend to use a “call” to keep everyone together. Pick a word or sound and whenever someone yells it, yell it back to them. It helps in keeping everyone aware of where everyone else is. Also it’s handy for quick cat herding when you want to leave crowded events on playa. And remember, megaphones can be used for more than just snark.
4. Get off your bike
If you’re riding your bike (or driving a car for that matter) and a whiteout hits, the first thing you should do is get off your bike. If you can’t see 2 feet in front of you, you don’t know what you’re about to hit. It could be rebar, it could be art, it could be a person, it could be a car. Chances are you’ll only be able to ride slightly faster than walking anyways, so be courteous to everyone else and walk it to shelter.
5. Tie down all the things
If you have any sort of structure, secure it. Carports are incredibly dangerous when they turn into tumbleweed. Even on the good weather years, a sudden gust of wind can send a carport flying. We like to use 3 ft pieces of rebar and multiple ratchet straps. Flying objects are probably the most dangerous thing during storms.
6. Get to shelter (carports, cars, RVs, etc)
Most of the dust storms we’ve experienced have been waited out in a well-secured carport with all the walls down. It stops some of the dust, provides some protection from flying objects, and that’s usually where the beer is. In really bad conditions, you want something a little stronger in between you and the dust and slightly larger flying things. Cars and RVs are better than carports for this. But for no reason should you try driving in a whiteout.
7. Embrace the experience
Once you’re sure that you’re in a safe place and your friends/neighbors/etc are too, embrace the experience. Anger, irritation, frustration, yelling, worrying, and being scared won’t make the dust go away any sooner. Weathering a dust storm on the playa is an experience you won’t get anywhere else.
Additional info
- Playa cam, aka what does the playa look like right now
- Current weather conditions in the Black Rock Desert (thanks to Friends of Black Rock)
- Bruce Damer describes the “Condition Alpha” storm of 2002 and also his Alpha Survival Guide
Tagged: Black Rock Desert, Burning Man, dust, playa, unsolicited advice
-- 1 Comment
2013 SXSWi Hotels Sold Out
Filed Under Events, SXSW on 2012-08-05, 12:04 | 2 Comments
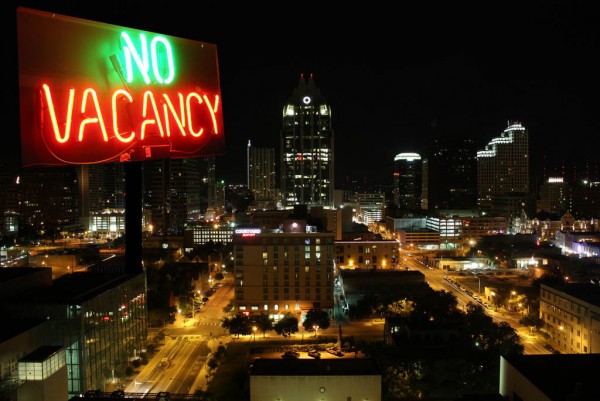
When SXSW 2012 registration opened a few days ago (July 30th), I was asked, “Does SXSW ever sell out?”. My answer was, “No, but the hotels do”.
The first year I attended SXSWi I decided to go at the last minute. The biggest challenge was finding a hotel room even remotely close to the Convention Center. I ended up at the La Quinta Inn Oltorf (1603 East Oltorf Street) which was about 2.5 miles from the convention center. While I had an incredible amount of fun, my week involved a lot of late night cab rides and I missed any sort of morning panels. After that I vowed never to stay that far away again. It’s like camping in the outer streets of Black Rock City when all the action is on the Esplanade
I heard rumors a few days ago that hotels near the Austin Convention Center were already sold out for the Interactive portion of SXSW. Today I checked on SXSW’s Hotel Availability page and sure enough everything close to the ACC is sold out for the Interactive portion of SXSW. If you’re going for just music, most hotels are still available, but for SXSWi the closest hotel available through the SXSW Housing Desk is “La Quinta – South”, 3.9 miles from the Convention Center. I imagine it won’t be long before all those rooms are gone too.
The highly coveted hotels are anything within walking distance of the Austin Convention Center. The Hilton is probably the most sought after place to crash with it’s proximity and tendency for late night lobby parties like the Revolving Door Party and the Backstroke Competition. Other popular hotels are the Courtyard Mariott/Residence Inn, the Driskell, and the W Hotel. Ever year I’ve found myself visiting friends or hitting the bar at these hotels.
If you’re like me, your first thought is probably, “Why not just book a room for 2014 right now?” The problem is SXSW blocks off rooms in all the nearby hotels and then only provides them to SXSW badge holders. There are two ways to get a badge, you either buy one or you’re given one for presenting a panel. In order to book a hotel room in one of the blocks that SXSW has held, you are required to have a badge. But this causes another problem, registration (for badges and hotels) opens well before panels are accepted. For SXSW 2012 I didn’t know whether my panel was accepted until December. There are hotel rooms held for presenters, but there is the risk that your panel is not accepted, and then you’re stuck in December and everything is sold out. Not a risk I’m willing to take.
SXSW Interactive is getting bigger and bigger every year. In 2010 (the first year Interactive was bigger than Music) there were 12-13,000 attendees. The next year, 2011, an estimated 20,000 people invaded Austin for the Interactive festival. Despite the rain this year, that number jumped up to 25,000 people. If this trend continues, we may see over 30,000 people this year and more people sharing beds out of necessity rather than a result of drunken hook-ups after the company party.
Image composite sources: anneh632 and Taber Andrew Bain
Tagged: Hotels, sxsw, SXSW Interactive, SXSW203
-- 2 Comments
Driving Across the Playa
Filed Under Video on 2012-08-02, 10:01 | Leave a Comment
A bit of a meditative drive across the open playa of the Black Rock Desert. This was in the north on the western side as we headed up towards Double Hot Hot Springs. Roughly around this area. You can even make out the “road” we eventually find towards the end. Thanks to a very dry year, the playa was bone dry where last year we helped rescue a sheriff’s stuck truck from the mud. This meant we could travel just about anywhere we wanted, clocking in over 100miles of playa driving over a couple days.
If you’ve never had a chance to drive across the open playa completely unrestricted, I highly recommend making the pilgrimage. You won’t set any land speed records (unless your car pushes over 760mph), but you can go about as fast as you feel comfortable in your car if the ground is flat and hard packed.
2012 SF Marathon in 9 Minutes
Filed Under Events, SF Bay Area, Video on 2012-07-30, 12:47 | Leave a Comment
20120729 – San Francisco Marathon from Ed Hunsinger on Vimeo.
A time-lapse video of the 2012 San Francisco Marathon as it ran through the Mission somewhere between miles 20 and 21. Thousands of people sprinted, jogged, shuffled, and walked down Guerrero St over the course of 4 hours. The video above starts with the first runner, Nathan Krah, who went on to win the entire race with a average mile of 5:36. A few more people trickle in behind him, but it’s not for awhile until you start seeing the crowds. At one point the course was diverted to a different street periodically in order to thin the crowds a bit, which is why you’ll see pulsing waves of people. Heather and I woke up early not only to catch this video, but also to cheer on our friend, Eric Bond, who ran all 26.2 miles at a still impressive 10:32 minute mile.
Tagged: time-lapse, timelapse
Quick Reviews of GoPro Accessories
Filed Under Gadgets & Hardware, Photography, Video on 2012-05-29, 11:00 | Leave a Comment
As a birthday present this year, my wife got me a GoPro HD Hero2 camera that I had been wanting for quite some time. Over the past couple of months I’ve spent quite a bit of time with it, as well as money on accessories. After answering questions from other people interested in the camera and accessories, I figured I’d put together a post for reference. I’ll focus mainly on accessories since the camera itself is awesome and doesn’t really have any competition to compare it with.

Normal Accessories:
I got the GoPro HD Hero2 Outdoor edition, which comes with what are in my opinion the most versatile accessories. If you intend to use the GoPro for surfing or motorsports, one of the other editions might be better for you. However for most people I feel like the Outdoor edition is the best choice. Here are the accessories it comes with and my opinions:
– The Waterproof Housing is what you’ll probably be using a lot. Chances are you want a GoPro for rough conditions where you wouldn’t want to be using another camera. Whether it’s dust, water, or just weather, the waterproof housing will be what you turn to.
– The HD Skeleton Backdoor is good when you don’t need to be water/dust/weather-proof, and want to capture sound a little bit better. The GoPro doesn’t get great sound in the waterproof housing. Also if there’s a chance for fogging, this housing is a good solution.
– I’ve only used the Vented Helmet Strap once on my normal bike commute to work through San Francisco. It was a boring video as my commute is usually boring, but I imagine anyone doing mountain biking or something similar would find a good use for this.
– I haven’t found a use for the Head Strap yet.
– I’ve already used both Flat Surface Adhesive Mounts. I put one on the inside of my windshield to do a drive time-lapse. Then upon viewing the video realized I positioned the camera directly in front of a ding in my windshield. *fist shake* The other mount was used on the inside of the windshield to relocate the camera. I’ve heard that these mounts can be removed with heat (such as a hair dryer) and then potentially reused with the existing sticky tape, or just ripping that off and attaching cheap 3M high density foam sticky tape to it. I haven’t used the Curved Adhesive Mounts as the snow season out here sucked this year. I imagine next year I’ll use them to attach the GoPro to my snowboarding helmet
– Haven’t found a use for the Three-Way Pivot arm other than the extra screw thing. (See GoPro Tripod Mount)
– Also comes with a USB Cable, the default battery and other assorted mounting bits.
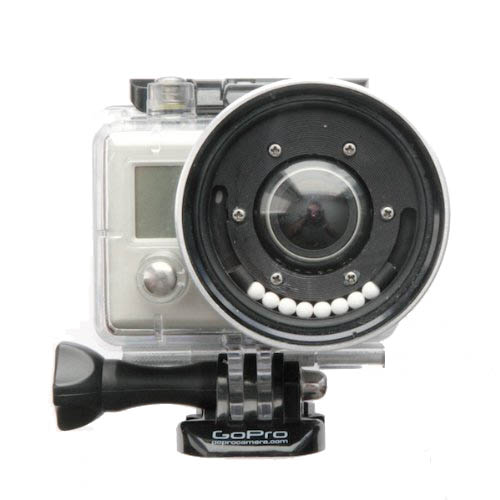
BlurFix GoPro Adapter
I modified the default waterproof housing by adding the BlurFix from Snake River Prototyping as I was planning on going diving in the British Virgin Islands and wanted crisp, clear video underwater. In the time since I modified my housing, GoPro has come out with a Dive housing that appears to have promise. I haven’t used one yet though, and will probably stick with the BlurFix for now since it’s what I have and it works well.
The BlurFix was relatively easy to add to the housing, however you can buy one with it already attached if you’re nervous about the process. The GoPro + BlurFix resulted in really nice video underwater for a couple of snorkeling trips in British Virgin Islands. However right before our SCUBA dive, I accidentally dropped the GoPro (ironically while adjusting the homemade wrist strap) and the filter on the front cracked. :( This meant all the subsequent dive trips were with the default GoPro housing lens. The difference in video from the default lens and the addition of the BlurFix is remarkable. If you’re filming underwater, don’t use the default waterproof housing.
Another thing I learned from my SCUBA footage is that the diving more than a few feet below the surface really begs for a lens filter. Snake River Prototyping includes a default UV filter with the BlurFix that has been filed down for a low profile (to reduce vignetting), but they also offer a number of other 55mm filters including filters intended for underwater use. As soon as I got home from the British Virgin Islands, I bought a replacement UV filter (plus a backup) as well as a URPro CY Filter from SRP so I would have them for the next trip. I also got the pricey $11 lens cap from SRP as the filed down low profile filters won’t take normal lens caps anymore. I have yet to play with other filters, such as polarizing filter, but in theory any normal 55mm filter should work, however there are reports of minor vignetting. One downside of the official GoPro Dive housing is that it won’t take any normal lens filters. It looks like it’s just a clear glass lens so I have to wonder how it does in deeper water in real life scenarios.
Conclusion: Worth the money for any underwater filming.
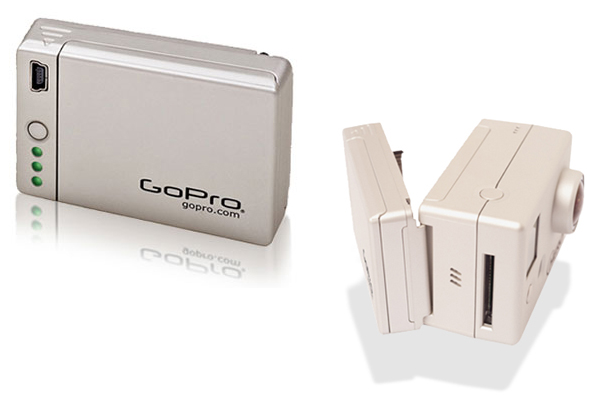
Battery BacPac
The Battery BacPac is by far the accessory I use the most. Since I do a lot of time-lapses I need the extra battery life. Fun Fact: Unlike other cameras, the GoPro remains powered on fully while doing a time-lapse, draining batteries in a couple of hours. If you’re doing a time-lapse or are planning on being away from a power source for a long time. The Battery BacPac and extra batteries are your friend. It’s also handy because you can use it as a battery charger in a pinch. And it’s a good way to know how much life you have left in a battery as it will be displayed by the green LEDs when you hit the button.
Conclusion: Worth the money.

Wasabi Battery and Charger Kit
One of the most annoying things I found out first about the GoPro was it’s lack of external charger. If you wanted to charge a battery you had to put it in the camera and plug it in via the USB cable. That meant no charging while shooting video out and about. I quickly bought the “Wasabi Power Battery and Charger Kit” which came with two additional batteries and a charger that would plug into both a normal wall outlet as well as an auto cigarette lighter outlet. All for less than $30. Hands down my first recommended accessory purchase. Pairing this with the Battery BacPac means I have yet to find myself in a situation where I’ve run out of battery power for my GoPro.
Conclusion: I couldn’t live without this.

LCD BacPac
The GoPro LCD BacPac screen was purchased on a whim with a birthday gift card. It was one of those “nice to have, but not required” accessories. Because the GoPro has such a wide lens, it’s pretty easy to point it at something and capture what you want. It may not always be centered and level though. I noticed this often with my timelapses so I thought I’d give the LCD a try. It does help a bit. It’s also handy for playing back videos and provides a slightly better interface for the menu, however I rarely use it. I’d recommend shooting a couple videos with the GoPro first before deciding you need the LCD. It’s pricey, but for some people I can imagine it would be very important. Keep in mind though that it prevents you from using the Battery BacPac and will additionally drain your battery.
Conclusion: Meh, probably not worth the money unless you know need it.
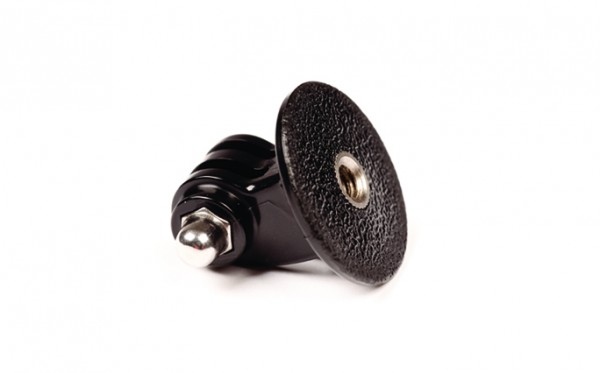
GoPro Tripod Mount
Buy it. It’s cheap, and it allows you to attach your GoPro to a number of different things. I personally use it mostly with an original GorillaPod. This is very useful if you’ve already invested in other camera mounting gear like tripods, monopods, GorillaPods, etc. This doesn’t come with a screw knob, but you can borrow the one of the Three-Way Pivot Arm.
Conclusion: No brainer if you have existing camera mounting hardware.
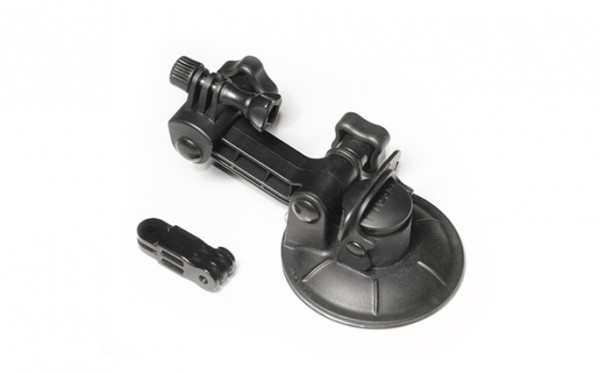
GoPro Suction Cup Mount
The GoPro Suction Cup Mount is one of the accessories I bought and have found myself most disappointed with. They say it’s supposed to keep your GoPro attached to a car (or even an airplane) at high speeds. I’ve only used it once, attaching it to an indoor window as a test to see how well the suction cup performed. It failed. I came back into the room and the camera was on the floor. I suspect that I may have needed to clean the suction cup and the window better, but my confidence in this mount has decreased so much that I’m worried about using it anywhere dangerous to the camera. I would definitely not recommend using it without some sort of backup device to prevent your camera from disappearing, i.e. a leash of some sort.
Conclusion: No sir, I don’t trust it one bit.
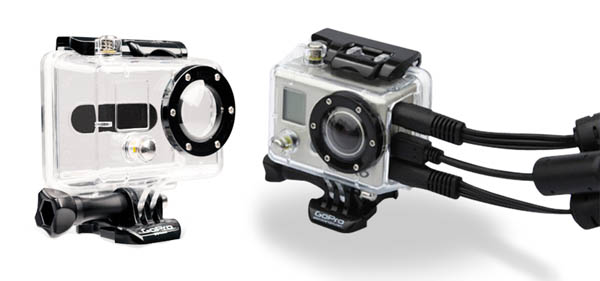
Additional Housings
Since I modified my original housing to add the BlurFix adapter I realized that I no longer had a GoPro housing that was capable of handling rough and tumble situations since the glass lens was susceptible to breakage. So I recently bought an additional GoPro Waterproof Housing, as well as a GoPro Skeleton Housing. The Skeleton Housing is by no means weatherproof, however it gives you access to the GoPro ports while shooting video. This means you can attach an external power source, providing unlimited power for long videos and time-lapses. I look forward to doing some longer driving time-lapses with this.
SD Cards, Laptop, Software, etc.
I’m using Transcend 32 GB Class 10 SDHC Flash Memory Cards. They’re cheap on Amazon (<$1 per GB) and are fast enough to handle the GoPro's output. If you're like me, you've got a handful of SD cards laying around. Check to make sure they're Class 10 (the fastest data transfer rates) before you toss them in your GoPro. There's no reason not to go with Class 10 cards unless you're extremely cost-sensitive. The GoPro produces high resolution stills and videos. Be prepared to deal with them. I actually experienced some annoyance at trying to deal with them on a 2008 Macbook Pro with only a 500GB drive. I upgraded to a 2012 Macbook Pro with a 2.4GHz quad-core Intel Core i7 processor, a 256GB SSD, and a 1TB drive (via OptiBay kit) and have zero trouble editing in iMovie. Eventually I'll maybe switch the software I use for video processing, but for now iMovie covers most of what I need for simple videos. It doesn't seem to like to export to full 1080p video, only 720x540, but since I'm mostly exporting for online viewing it's not that big of a deal. It may be a limitation of iMovie or it may be a setting I'm missing. If anyone has any feedback, let me know. A lot of people have reported fogging issues with their GoPro as the camera itself heats up with usage. Depending on moisture and temperatures you may experience the same. We ran into it only once in BVI while shooting some video of boat swinging. A quick wipe of the lens and things were fine, however we didn't notice it at first since we weren't using the LCD screen. People say the official GoPro fog strips are a bit pricey, but worth the money. I’ve purchased a pack and plan to use them to prevent fogging issues before they happen. There are some home-made remedies, but these are made to fit snugly inside the GoPro housing without damaging the camera itself.
Finally…
There’s a lot of info and video examples of what you can do with the GoPro online. One of the best forums I’ve found is GoProUser.freeforums.org. You’ll have to register, but it’s worth it to poke around on there.
I love my GoPro HD Hero2. It hasn’t replaced my iPhone as a daily-carry video camera since the GoPro requires more accessories and is a bit bulkier. However it does go on every trip with me now and I’m always trying to find an excuse to use it for something.
Oh wait, Videos!
Here are some videos I’ve taken with my GoPro HD Hero2. Keep in mind these aren’t full resolution. The resolution of the raw videos is far far better.
Curious Kiss Cafe Time-lapse
On on Highway 1 (driving time-lapse)
Snorkeling in the British Virgin Islands (with BlurFix)
Nelz goes Boat Swinging
San Francisco to Monterey drive time-lapse
Full disclosure: Nobody compensated me in any way for anything in this post, however some links are Amazon affiliate links.
Tagged: GoPro, time-lapse
Gary Connery Successfully Lands Wingsuit Flight Without a Parachute
Filed Under Video on 2012-05-23, 09:57 | Leave a Comment
After over a month of delays, Gary Connery’s wingsuit jump finally happened Wednesday, May 23rd! Everything appears to have gone well and the first video has been posted. This makes him the first person to land a wingsuit flight without a parachute. Well at least the first to land successfully and unharmed in this often dangerous sport.
A big congratulations to Gary!
Previous post about this stunt: Gary Connery to Make the First Attempt to Land a Wingsuit Flight
Gary Connery to Make the First Attempt to Land a Wingsuit Flight
Filed Under News on 2012-03-11, 15:28 | 1 Comment
I’ve been fascinated with wingsuit flying ever since the first video I saw a couple years back. I’ve posted about wingsuit flying previously, and I can’t begin to count the number of times I’ve shared videos like Jeb Corliss’s Grinding the crack with people. When watching videos of BASE jumpers with wingsuits I always have the thought, “When are they going to pull their parachute?” What if the answer was “they aren’t”?
Gary Connery plansto be the first person to do exactly that. In April of 2012 he will be the first person to jump from a helicopter with a wingsuit but no parachute. It will all go down in the UK, in the Ridge Wood area, just northeast of Henley-On-Thames. Gary will be jumping from a helicopter at a modest, but still dangerous, height of 2,400ft. He will quickly accelerate to around 80mph, then glide at 60mph (while falling at 22mph) almost a mile away to land in a box rig. (A box rig is a large stack of cardboard boxes commonly used in the stunt industry to cushion falls like this 150ft jump). Approximately 200ft away from the box rig, Gary will need to flare his custom made wingsuit in an attempt to bring his gliding speed down to 50mph and his vertical falling speed to 15mph before not-so-gently landing in the pile of cardboard.
Jumping from high places and flying in wingsuits is obviously nothing new to Gary. He has over 880 skydives and 450 BASE jumps under his belt, and has spent the last 8 years focusing on wingsuit flying. He’s also an experienced stuntman who’s done a number of jumps for movies such as The Beach, and Indiana Jones and the Kingdom of the Crystal Skull as well as an experienced stunt coordinator for dozens more. Check out his IMDb page as well as videos of him flying through the infamous “Crack”, and doing a 60ft jump into a box rig.
Gary Connery, much like Jet Man Yves Rossy, is doing this all with the help of a watch company. The British based company Bremont is sponsoring this attempt at breaking a world record of being the first to land a wingsuit. In addition, Gary is working closely with Tonysuits, a wingsuit manufacturer, to make a custom designed wingsuit that will help him land this attempt. Best of luck to Gary and I can’t wait to see the video!
Tagged: Bremont, crazy, Gary Connery, skydiving, stunt, wingsuit
-- 1 Comment
One on Highway 1 Time Lapse
Filed Under Art, Personal, SF Bay Area, Video on 2012-02-20, 16:48 | Leave a Comment
On Sunday I hopped in my car, attached my GoPro camera to the windshield and headed down Highway 1. For those not familiar with the area, Highway 1 winds down most of the coast of California and affords quite the view out across the Pacific Ocean as you wind around hills, fields, and cliffs. It’s one of my favorite drives and I recommend it over Interstate 280 if you’ve got the extra time. I recently realized that I’ve been missing long drives by myself. I really enjoy how they give me time to think while the scenery constantly changes and good music plays on the stereo. Plus driving along a beautiful highway with all sorts of interesting turnouts makes for a good way to spend the afternoon.
My recent acquisition of a GoPro HD Hero2 camera (thanks Heather!) and various accessories has me using it for all sorts of things. In addition to shooting wonderful 1080p video underwater in the British Virgin Islands, one of the features of the GoPro camera is a time lapse mode where it can take a nice high resolution image every second. The small size and portability of the GoPro as well as the various mounts make it much easier to use versus my gigantic Pentax K20D dslr. But, not having a dedicated LCD screen makes aiming the GoPro a bit difficult, so the video is slightly tilted as the windshield mount isn’t perfectly level and when I took it out on the cliff I was just using a Gorillapod in the grass so you might have to tilt your head a bit. I do have the LCD Bacpac to help with lining up shots, but for time lapses the Battery Bacpac takes priority.
For those wondering how I put everything together, it’s actually quite simple. Quicktime Pro 7 has a great “Open image sequence” feature that I used to make all the individual clips, then I wrestled with iMovie 11 and its limitations to put together the clips with some simple transitions and audio. I used ccMixter to get some Creative Commons music that would work with the track, eventually settling on DLDN Instrumental by timberman. I’m still trying to figure out a good system to match up the music I’m actually listening to while the photos are being snapped and try to recreate the feeling in the final video, but haven’t figured that out yet, not to mention the copyright issues of posting that music on video hosting services. In this case the soundtrack to a good portion of the trip was “Moods for Take Out”, an album I had received from the musicians themselves the previous weekend. Throw in some High Contrast, Underworld, and Boards of Canada and you’ve got the playlist for the afternoon.
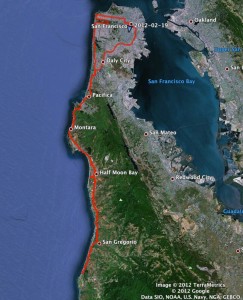
If anyone’s interested, my route, tracked by my Garmin Vista HCx, is below. As you can see, I had a bit of a roundabout journey through the city thanks to a few blocks of the Great Highway being closed around Ocean Beach. The video of that fiasco as well as video of all the hanggliders and paragliders at Fort Funston was sadly never captured. (Note to self: check camera blinky red light more often) But as I headed south I managed to hit a handful of beaches and recognizable areas including my favorites: just past Devil’s Slide at the beginning of the video, Pompanio Beach, and Pescadero Beach. As the sun set, I watched the light of a boat on the horizon blink as it rolled on the Pacific waves and the stars and planets dotted the sky. Not a bad way to spend my Sunday.
Pyrotopia: A Fire Arts Festival for the East Coast
Filed Under Events, Fire Art on 2012-02-18, 20:54 | Leave a Comment
Want to play Simon with fire, watch well-dressed performers twirl fire, or hear the crackle of a Tesla coil but are stuck on the East Coast? Well if you’re anywhere near Pittsburgh you should go check out Pyrotopia on April 27th and 28th. It’s not often that the east coast gets a fire art festival. and to top it off this one is free and open to the public and is family-friendly.
(via Laughing Squid)

