DD-WRT, Tomato, or default Linksys firmware?
Filed Under Gadgets & Hardware, Hacks and Mods | 2008-10-15, 15:26

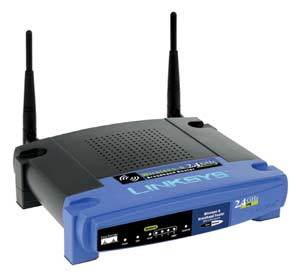
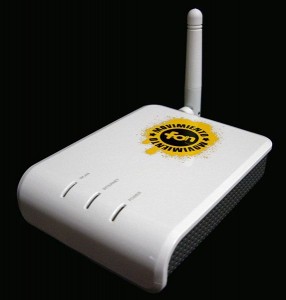
One of my best “sidewalk scores” since I moved to the Bay Area was a Linksys WRT54G router (v4). This brings up the count of WRT54G routers in the apartment to 3, plus the La Fonera wireless bridge to a friend across the street. How are they being used and what are they running?
Previously I had a WRT54GS (v6) running as our main router/wireless AP. It was running the default Linksys firmware and did a decent job. It’s easy to configure, and it just works once things are all setup. I have had to reboot it a couple times (maybe 3-4?) in the past year, but that’s not that big of a deal. The default firmware is simple, usually easy to understand, but lacking in “fun” features. It also seemed to not really pay much attention to my QoS rules as torrent traffic always chokes our network. It was acceptable, but I wasn’t exceedingly happy or excited with the firmware. Plus it hurts your geek cred to run default firmware when it can be hacked, right?
So, something had to be done about this boring firmware. The sidewalk scored WRT54G just got the Tomato firmware (v1.21) installed on it and replaced the WRT54GS as our main router. I first had to hold down the reset button for 30 seconds to reset things to factory defaults to wipe out the previous owner’s username/password. Then I was able to log into the web interface (default Linksys password is “admin”) and it was beyond easy to upgrade the firmware from the default Linksys firmware to Tomato. You literally browse to the download Tomato firmware and click upgrade. A few minutes later I reloaded the web interface (entered the default password of “admin”) and saw Tomato’s minimalistic admin interface. I ran through and matched all the settings to our existing router and then waited for Heather to take a lunch break to swap them out without any problems. I’ll probably re-flash the old router with DD-WRT or Tomato and drop it back in the office to use on the other end of the ethernet cable I ran back there to have a wired network.
Speaking of the office, there’s also a third WRT54G (v.3) router back there. It’s wired up in the rolling media center, which is comprised of an Ikea rolling shelf thing housing an audio reciever, Xbox, Playstation 3, and 32″ LCD HDTV. Because I keep most of my media on a machine in the living room, but want to play it on the TV, I wanted to be able to stream to either the Xbox or PS3. I used a WRT54G router with it enabled as a wireless bridge using DD-WRT. It utilizes its more sensitive antennas to pick up the weak wireless signal from the living room and then share it with other wireless devices as well as the hardwired Xbox, PS3, and laptop. I set it up once over a year ago, and have not had to touch a single setting on it nor had any problems. It was incredibly easy to setup and it has been rock solid.
So, I know everyone wants to know, what’s the best firmware replacement? Well, ultimately it’s up to you and how you’ll use the router. But here are my thoughts:
Default firmware:
If you’re lazy and just have a normal network setup (cabled modem + wireless router + laptop + wired PC, etc.), and don’t care about tweaking things, then the default firmware is problem fine. If you ever run into a problem, you can call up Linksys tech support and they can help you out.
DD-WRT:
DD-WRT served me very well for several years. However it doesn’t get a lot of development these days. One annoying thing is that it continuously reboots the router when you have to make changes, which can get annoying as you wait each time for it to come back up. It was also extra steps to set up traffic logging so I could quench my stats junkie. It’s a great project, and works incredibly well. I have very few complaints and would probably have kept using this.
Tomato:
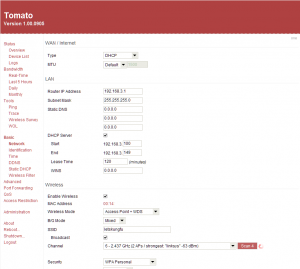
However, with my first impressions of Tomato, I’ve found a new firmware to love. Tomato’s interface is incredibly nice and clean:

It’s quick and easy to browse around and change settings. Most settings don’t require restarting as it just restarts the necessary services. It’s on par with DD-WRT, but it has one feature that really sold me on it, bandwidth graphs. Tomato has real-time bandwidth stats where you can watch it update (on a 2sec refresh) your current bandwidth usage based on the network interface (wired/wireless/etc). This alone made me want to install Tomato, and everything else I’ve run into has been a plus. One other nice surprise is that you can mount Samba (i.e. Windows Sharing) file shares in Tomato. So I currently have it backing up the bandwidth stats to a shared folder on another server every hour right now. I’m sure this can be used for all sorts of other fun things I have yet to think of too.
So in the end, unless something terrible rears it’s ugly head, Tomato is now on top in my book due to its interface and stats capabilities.
UPDATE: I noticed shortly after switching to the Tomato based router that streaming .avi videos over a Windows file share was uncommonly jumpy. After some research I went into the Administration->Configuration section and selected “Erase all data in NVRAM memory”. This is recommended if you are switching from a different firmware to Tomato, and will set everything back to defaults. After doing that and reconfiguring, video streaming seemed even better than before!
Using the La Fonera Router from Fon as a Wireless Bridge
Filed Under Gadgets & Hardware, Hacks and Mods | 2008-09-26, 18:43
(If you haven’t hacked DD-WRT onto your Fon router yet, you probably want to read this article: Hacking the La Fonera Fon Router with DD-WRT)
So you’ve got a Fon router with one ethernet port and wireless hardware, what do you do with it? Well you could use it for a number of things thanks to the flexibility of DD-WRT, but I’m going to tell you how to use it as a wireless bridge to connect a device with an ethernet port to your wireless network. This is assuming you’ve already flashed DD-WRT v24 RC7 onto your Fon router.
Plug the Fon router into your laptop/desktop using an ethernet cable. (You’ll probably want to disconnect your machine from any wireless or wired connections while working on this to avoid confusion)
On your computer, set your IP address to manual and set it as something like 192.168.1.166. Anything in the 192.168.1 subdomain will work though.
Open a web browser and connect to the Fonera web interface (http://192.168.1.100 Username: root Password: admin)
Under the Wireless tab, set the Wireless Mode to “Client Bridge”.
Set the Wireless Network Name (SSID) to match the SSID of the router you want to bridge.
Set the Wireless Network Mode to match the router too (probably just leave it at Mixed)
Under Wireless->Wireless Security, setup your security settings like WPA, keys, etc. These should match the router you’re bridging
Then you should check under Status->Wireless and you should see that you are connected to the SSID of the access point you specified.
Go to Setup->Basic Setup and under “WAN Connection Type” set Connection Type to Static IP and manually give your Fon an IP that matches the subnet of your network, i.e. 192.168.1.3.
Set the Gateway and Static DNS 1 to your main router’s ip (mine is 192.168.1.1).
Also change the Network Setup to match these settings.
Change the DHCP Type to “DHCP Forwarder” and the DHCP Server to your main router’s IP address. (This is all of course assuming you’re using DHCP on your router.)
Under Setup->Advanced Routing, change Operating Mode to RIP2 Router
Check under Status->Wireless and you should still be connected to your main router.
Reboot the Fon router (under Administration->Management, at the bottom), unplug and replug the ethernet cable, and reconnect to the web interface, this time using http://192.168.1.3 (or whatever IP you set the Fon router to be). Be patient as the Fon may take awhile to reboot.
Test your internet connection and connection to other local machines on your network, making sure you’re using the ethernet connection to the Fon router. If everything went well, you should be all set!
You should now be able to use the tiny Fon router to hook up one device via ethernet. This could be a Playstation 3, or an Xbox/Xbox 360, or maybe a single computer in a different room that you couldn’t run CAT5 cable to. It’s up to you!
Hacking the La Fonera Fon Router with DD-WRT
Filed Under Gadgets & Hardware, Hacks and Mods | 2008-09-24, 21:47
I live across the street from a friend and we thought it would be handy to be able to connect to each other’s machines in order to transfer files back and forth. Rather than just connect to each other’s networks as needed, we figured it’d be easier just to setup a third “across-the-street” network. This means that we both need endpoints to connect to the other. For me, I chose to use an old Fon “La Fonera” router that I had stuffed away in a box months ago. Unfortunately the firmware that ships with the Fon router doesn’t have support to do anything like this. Luckily there are free, open-source firmwares out there like DD-WRT that are robust enough to meet our needs. The first major step was to actually get DD-WRT on this router. Here’s how I did it and how you can too:
You’re first going to need some tools:
– An ethernet cable and a laptop/desktop to use. I also recommend having a second machine that you can use just for an internet connection in case you run into trouble.
– Telnet and SSH clients (putty on windows, built-in on OS X)
– A TFTP server setup with the latest release of DD-WRT:
— For Windows, you can use Simple TFTP server
— For OS X, you can use the built-in TFTP server with the following commands:
sudo mkdir /private/tftpboot
sudo /sbin/service tftp start
To test your TFTP connection put a file in /private/tftpboot and try the following:
tftp localhost
get filename
If TFTP is working, great, go grab the v24 RC7 version of the linux.bin file for DD-WRT here and drop it into /private/tftpboot since we’ll need this later. Just in case, I’ve mirrored a copy of linux.bin.
Ok great, your initial things are setup and ready. The first real step is to get SSH enabled, and this proved to be the most challenging as I tried to piece together information from various sites on various methods. Luckily it should be easy for you. How to go about this is different depending on the firmware you have on your Fon router. I had 0.7.1 r2 so I couldn’t use the html form injection method and had to use what is called the Kolofonium hack. Basically it means you set the Fon router to use manual network settings and set the DNS server to 88.198.165.155. Then plug the router in and it will attempt to connect to a Fon server to update. The new DNS server you’ve specified is special though, and will redirect this request to a different server, which will provide different firmware that will then have SSH enabled on the device. This should work for most devices. Once this is done, you’ll need to SSH into the device (ssh 192.168.1.1 with username of “root” and password of “admin”) and enable it permanently by executing the following:
mv /etc/init.d/dropbear /etc/init.d/S50dropbear
Great, SSH is now enabled permanently. Next up, flashing the firmware. Connect via SSH to the LaFonera, and execute the following commands:
cd /tmp
wget http://fonera.info/camicia/openwrt-ar531x-2.4-vmlinux-CAMICIA.lzma
mtd -e vmlinux.bin.l7 write openwrt-ar531x-2.4-vmlinux-CAMICIA.lzma vmlinux.bin.l7
reboot
After a few seconds to allow the Fon to reboot, reconnect over SSH and execute the following:
cd /tmp
wget http://fonera.info/camicia/out.hex
mtd -e “RedBoot config” write out.hex “RedBoot config”
reboot
At this point the Fon router will not be able to boot fully, but don’t worry. We’ll be connecting to it via Telnet. You’ll want to manually configure your machine’s network to be on the 192.168.1.* subnet, I used 192.168.1.166 as the IP for my laptop. Then plug the Fon router in via ethernet and connect via telnet on port 9000, aka “telnet 192.168.1.254 9000”. Once you connect, you may have to hit enter, but then you should see a “RedBoot>” prompt.
Now is the time to use that TFTP server you setup earlier. At the RedBoot> prompt on the Fon router, execute the following:
ip_address -l 192.168.1.254/24 -h 192.168.1.166
If you didn’t setup your computer to 192.168.1.166, replace that with whatever IP address you did use.
Now execute the following:
fis init
load-r -b 0x80041000 linux.bin
fis create linux
The last step (fis create linux) may take awhile. Go make a turkey pot pie or something. Mine took about 20 minutes. When that is done, don’t reboot yet, we still need to set a few things for the Fonera to boot correctly. At the RedBoot> prompt, type “fconfig” and hit enter. Then hit enter (or type the following) as you go through the boot script setup:
Run script at boot: true
Boot script:
.. fis load -l vmlinux.bin.l7
.. exec
Enter script, terminate with empty line
>> fis load -l linux
>> exec
>>
Boot script timeout (1000ms resolution): 10
Use BOOTP for network configuration: false
Gateway IP address:
Local IP address: 192.168.1.254
Local IP address mask: 255.255.255.0
Default server IP address:
Console baud rate: 9600
GDB connection port: 9000
Force console for special debug messages: false
Network debug at boot time: false
Update RedBoot non-volatile configuration – continue (y/n)? y
… Erase from 0xa87e0000-0xa87f0000: .
… Program from 0x80ff0000-0x81000000 at 0xa87e0000: .
RedBoot>reset
Great, now your Fon router should be rebooting. Unplug the ethernet and connect to the wireless AP named “dd-wrt” (login is root/admin if it asks). You should be seeing the DD-WRT control panel in your browser and you are now connected to your Fon router running DD-WRT! Congrats!
Next time, I’ll post how to get your Fon router to act as a wireless bridge to extend your wireless coverage to another device that has an ethernet port, like an XBox or Playstation 3.
A lot of this info came from various sources. I have rewritten and reposted it here in the spirit of propagating the information. In my research I came across some sites and files that were necessary (for old methods) that were no longer available. I didn’t want anyone else to run into this problem. The information above is from my own experience and the combination of bits and pieces from the sites below. Note however that some of these sites may have outdated information, but may be useful if you have older firmware or something:
The Kolofonium Hack (information on how the old and new methods of enabling SSH on the Fonera work. Interesting if you want to know what vulnerabilities are being used to hack this router)
DD-WRT Wiki page on hacking the La Fonera
Hacking the La Fonera (the old method of enabling SSH on old versions of the Fon firmware)
Traffic Logging with WRTbwlog
Filed Under Gadgets & Hardware, Hacks and Mods | 2006-10-07, 01:32
I’m a stats junkie, I’ll be the first to admit it. Ever since the first few days at college on a T1 line I’ve wanted to keep an eye on how much bandwidth I could burn through. With a few additions to DD-WRT on the Linksys WRT54G router you can see where all your bandwidth is going. The WRTbwlog page has some great info on setting things up, but we ran into a few snags so we thought it was worth a post. Here’s how to test it out to see how you like it:
First, we’ll assume you’ve already purchased a Linksys WRT54G router and flashed the firmware to install DD-WRT. We’re working with DD-WRT v23 SP1 Final (05/16/06) std.
Next you’ll need to go and get a copy of WRTbwlog. As of writing this the version of WRTbwlog that’s actually available on their site does not work with the latest releases of DD-WRT. But never fear, krikkit over on the DD-WRT forums fixed it. You can read all about it in this thread. So we’ll use this copy of his fixed version. But wait, let’s save us some trouble and just download it straight to the router.
Go ahead and ssh into the DD-WRT router. (how to enable ssh) Copy and paste the following commands:
cd /tmp
wget http://www.geeked.info/wp-content/files/wrtbwlog_cust_exp.tgz
tar -xzf wrtbwlog_cust_exp.tgz
rm wrtbwlog_cust_exp.tgz
cd bwlog
./start.sh
This should startup WRTbwlog. If you grabbed krikkit’s version, you’ll probably see a message that says:
ftpget: Unable to connect to remote host (192.168.1.100): No route to host
You can either ignore it or you can download our fixed copy.
Now, from a desktop load up a web browser, hit a few of your favorite websites to generate some traffic, and then go to http://192.168.1.1:8000/traffic.cgi and marvel at the stats. (If your router isn’t 192.168.1.1, replace it with the appropriate IP address obviously). Go surf some sites, download some things, and then go back and refresh the traffic page. Pretty slick, eh?
Only one problem at this point, you’d have to execute the commands above every single time you rebooted your router. If you’re like me, that’s once every few weeks, but it would still be a pain. So let’s get bwlog installed permanently on the router. It’s painless, I promise.
Log into the web interface for DD-WRT and go to the Administration tab->Diagnostics Tab. Most of you can probably just click here.
We’re going to add something so that WRTbwlog is automatically installed and started, but first a comment. If you can, please download the .tgz file and host it on your own server. It’ll be faster for you (and cheaper for me in bandwidth costs). And then replace the obvious text below
In the Commands box paste the following:
for i in 1 2 3 4 5 6 7 8 9 10 11 12 13 14 15 16 17 18 19 20;
do
sleep 5
cd /tmp
/usr/bin/wget http://www.YOURWEBSERVER.com/PATH/TO/wrtbwlog_cust_exp.tgz
/bin/tar -xzf wrtbwlog_cust_exp.tgz
rm wrtbwlog_cust_exp.tgz
cd bwlog
( ./start.sh & ) &
done
(source)
Click “Save Startup”
Reboot your router, and check http://192.168.1.1:8000/traffic.cgi and hopefully smile. You’re all set!
If you want to take the extra steps to save your traffic logs across reboots you’ll need to look into setting up an FTP backup. Unfortunately with the latest versions of DD-WRT necessary components (ftpput) are missing and this isn’t possible yet. But when it’s fixed, you can check WRTbwlog’s page for more info on this and the rest of WRTbwlog’s features and settings.
Where’d my Internet go?
Filed Under Geek | 2006-10-06, 23:30
The last week or so my internet connection has been going down seemingly randomly. It’ll go down for awhile and then come back just like normal. What made it odd was that a friend in Texas (I’m in Chicago) was also going down at the same times. After 3 or 4 “coincidences” we decided this wasn’t normal. After narrowing down the similarities, we started looking at our routers, both Linksys WRT54G running the hacked DD-WRT firmware. While it wasn’t a problem with a router, this focused my attention to where I would find the necessary clues.
The next time I lost my connection I noticed the led on my WRT54G router for “Internet” blinking like crazy, indicating a large amount of traffic. I couldn’t even access the router across my lan. I unplugged the router from the cable modem and instantly got access to the web interface. Plugged it back in, no access. Plugged directly into the cable modem with my desktop and got a solid connection again. Whatever is coming through doesn’t affect my Windows machine.
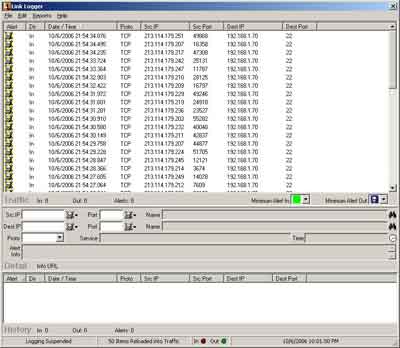
Logging is always good, so I downloaded Link Logger and setup DD-WRT to log to my desktop (see below for how-to) and waited. Sure enough I lost a connection about an hour later. Luckily all the evidence I needed was sitting in Link Logger.
Looks like someone from .se was trying to hammer on my ssh server with multiple machines. Since there are so many machines and so many attempts it was holding me down and not letting anything else through. A typical denial of service. So I unplugged the desktop from the router, plugged directly into the cable modem, power reset the modem to get a new dhcp lease, and started figuring out how to drop the ssh packets. I ssh’ed into DD-WRT while it was not plugged into the internet, and ran the following command line:
iptables -A INPUT --source 213.114.179.0/24 -j DROP
(This will block all incoming traffic from 213.114.179.*)
Of course when I plugged back in, he was no longer hammering, and I didn’t get a chance to test it. I dropped into the DD-WRT web interface, under Administration->Diagnostics and added the iptables command so it will run on startup. This way when I reboot the router it will still have that rule. Let’s hope that stops this mess.
While discussing this with my friend in Texas, we realized the true link between us and these Swedes was not our router, but rather our use of DynDNS. DynDNS is a quick (free) way to get an easy to remember domain that resolves to your home connection. We both have *.homeip.net addresses. I’d be willing to bet these wankers were just scanning for people with homeip.net addresses. Another clue to this was the fact that the attacks were still occurring with IP changes. DD-WRT has an option to automatically update your DynDNS name when your IP changes.
IP Addresses logged: (I wasn’t able to capture all of them as the Trial version of Link Logger doesn’t save them)
213.114.179.203
213.114.179.207
213.114.179.209
213.114.179.210
213.114.179.211
213.114.179.212
213.114.179.214
213.114.179.217
213.114.179.219
213.114.179.224
213.114.179.229
213.114.179.232
213.114.179.236
213.114.179.242
213.114.179.245
213.114.179.247
213.114.179.249
213.114.179.251
All of these resolve to *.cust.bredbandsbolaget.se.
How to log from your router
(This applies to DD-WRT v23 SP1 final)
- Log into the web interface for DD-WRT and go to Administration->Services
- Scroll down and enable “System Log”
- Save Settings
- Scroll back down and provide the IP address of the machine you want to log to.
- Save Settings
- Go to the Administration->Log tab
- Enable the Log, set the Log Level to High, and everything to On (this way everything gets logged)
- Save Settings
- Download and install Link Logger
- Point it to your router’s IP if necessary (Edit menu->Setup->Router Tab)

